I am developing a new application and I wanted to use CakePHP because I used it before and am pretty familiar with it. However, I wanted to have a more snazzy UI design so I looked around at some of the UI frameworks out there. Here are some of the ones I looked at:
After evaluating them I decided to give Bootstrap a try. Now to get it working with CakePHP…
Step 1: Download CakePHP and Twitter Bootstrap
To get CakePHP, go to CakePHP.org an download the latest release (2.06 at the time of this writing), and head over to the Bootstrap site to get it. Note: for the purposes of this post, do not use the download link from the Bootstrap homepage, instead click on the Git button and then download The source from the Git repository. We need to do this because the index.html file is not included in the normal download link an we will be using it as a starting point for our CakePHP layout and templates.
Step 2: Copy the Bootstrap files to CakePHP setup
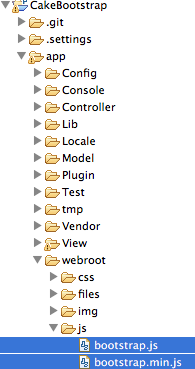
Once you have them both downloaded, you will need to copy the bootstrap files into the CakePHP structure.
Copy the Js from the Bootstrap source:

Bootstrap javascript source to copy
Then copy the css and images in the same way.
Step 3. Setup the CakePHP default template
In the CakePHP source, go into the Views->Layouts directory and open up the default.ctp. The simplest way to update this is to copy the contents of the Bootstrap index.html file directly into this file and go through it and replace and correct all the references in it to be the standard CakePHP implementation.
For Example, replace the <meta charset=”utf-8″> with <?php echo $this->Html->charset(); ?>. Then remove the static title with <title><?php echo $title_for_layout; ?></title>. Continue on with the conversion and you will end up with a file like this:
<!DOCTYPE html>
<html lang="en">
<head>
  <?php echo $this->Html->charset(); ?>
  <title><?php echo $title_for_layout; ?></title>
  <!--  meta info -->
  <?php
    echo $this->Html->meta(array("name"=>"viewport",
      "content"=>"width=device-width,  initial-scale=1.0"));
    echo $this->Html->meta(array("name"=>"description",
      "content"=>"this is the description"));
    echo $this->Html->meta(array("name"=>"author",
      "content"=>"TheHappyDeveloper.com - @happyDeveloper"))
  ?>

  <!-- Le HTML5 shim, for IE6-8 support of HTML elements -->
  <!--[if lt IE 9]>
  <script src="http://html5shim.googlecode.com/svn/trunk/html5.js"></script>
  <![endif]-->

  <!-- styles -->
  <?php
    echo $this->Html->css('bootstrap');
    echo $this->Html->css('bootstrap-responsive');
    echo $this->Html->css('docs');
    echo $this->Html->css('prettify');
  ?>
  <!-- icons -->
  <?php
    echo  $this->Html->meta('icon',$this->webroot.'img/favicon.ico');
    echo $this->Html->meta(array('rel' => 'apple-touch-icon',
      'href'=>$this->webroot.'img/apple-touch-icon.png'));
    echo $this->Html->meta(array('rel' => 'apple-touch-icon',
      'href'=>$this->webroot.'img/apple-touch-icon.png',  'sizes'=>'72x72'));
    echo $this->Html->meta(array('rel' => 'apple-touch-icon',
      'href'=>$this->webroot.'img/apple-touch-icon.png',  'sizes'=>'114x114'));
  ?>
  <!-- page specific scripts -->
    <?php echo $scripts_for_layout; ?>
</head>

<body data-spy="scroll" data-target=".subnav" data-offset="50">
  <div id="container">
  <!-- Navbar ============================================= -->
  <div class="navbar navbar-fixed-top">
    <div class="navbar-inner">
      <div class="container">
        <a class="btn btn-navbar" data-toggle="collapse"
          data-target=".nav-collapse">
          <span class="icon-bar"></span>
          <span class="icon-bar"></span>
          <span class="icon-bar"></span>
        </a>
        <a class="brand" href="./index.html">Bootstrap</a>
        <div class="nav-collapse">
          <ul class="nav">
            <li class="active">
              <a href="<?php echo $this->webroot;?>">Home</a>
            </li>
            <li class="">
              <a href="./base-css.html">Base CSS</a>
            </li>
            <li class="">
              <a href="./components.html">Components</a>
            </li>
            <li class="">
              <a href="./javascript.html">Javascript plugins</a>
            </li>
            <li class="">
              <a href="./less.html">Using LESS</a>
            </li>
            <li class="divider-vertical"></li>
            <li class="">
              <a href="./download.html">Customize</a>
            </li>
            <li class="">
              <a href="./examples.html">Examples</a>
            </li>
          </ul>
        </div>
      </div>
    </div>
  </div>
  <div id="row">
    <?php echo $this->Session->flash(); ?>
    <?php echo $content_for_layout; ?>
  </div>
  </div>
  <?php echo $this->element('sql_dump'); ?>
</body>
</html>
Once you have that in place you can then try it out and you should see something like this:
I hope this helps getting you setup and running with CakePHP and Twitter Bootstrap. If you have any questions/comments let me know, and as always Happy Developing.


Its a nice introductory tutorial. I would love to read another tutorial from you about CakePHP forms as I find it more difficult thing with Twitter Bootstrap.
Thanks! I am planning on writing up a post on using CakePHP Forms with Twitter Bootstrap shortly, I hope to have it finished by the end of the week.
I, too, would be interested in reading how you go about integrating CakePHP’s form helper with Twitter Bootstrap
I’d love to hear more about how you’re using them together! This is a great start. I’ve been using them to build an app and while they’re both fantastic, some things are a bit tougher to get working. For example, making icons that are links…
Hi thanks for this, just getting started with cakePHP. Looks like it is going to be a great tool to work with.
Reblogged this on CakePHP Tutorial.
@Stokes: yes, a really great start but it would be nice to see what’s next:)
I would love to see the next part of this tutorial.
thanks very informative for beginners